OpenCTI #3 - Platform administration
Discover OpenCTI in this series. This third post will walk you through the administrative section of OpenCTI.

We previously saw how to start with the platfrom.
Before getting serious with intelligence collection and processing, we must go through the application settings to make sure that the platform corresponds to our needs.
There are 2 main places we can configuration OpenCTI:
- In the environment and configuration file (like we did in
docker-compose.yml) - In the application itself
We will control different parameters in both places. The first will allow us to configure system and infrastructure-related settings, whereas the second will allow us to customize the instance to our own needs. We will focus on the latter in this post.
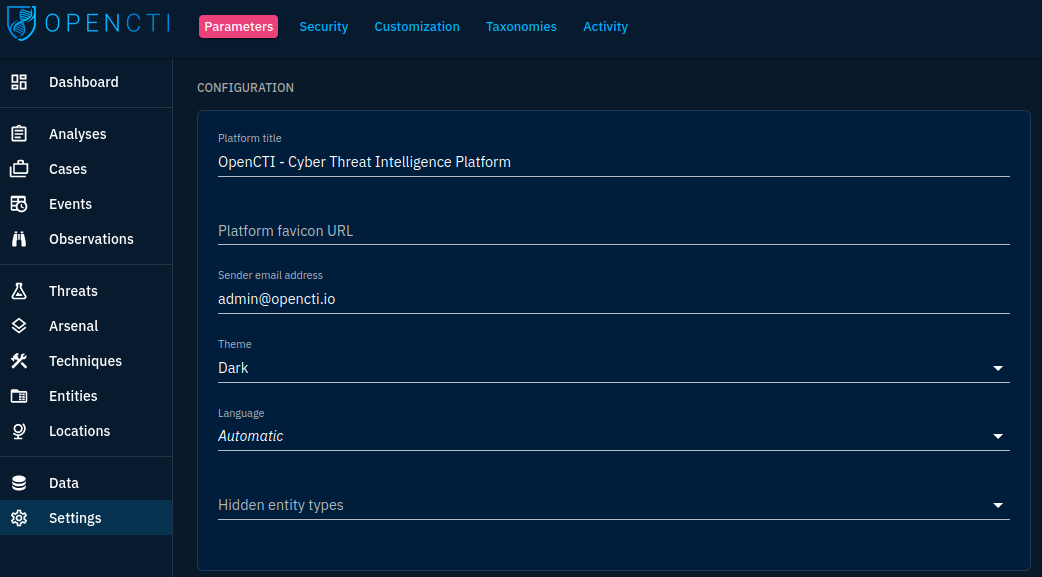
General settings (aka "Parameters")
Let's dive into the first panel we get when choosing the "Settings" module in the left navigation pane:
The Parameters tab regroups several panes:
- Configuration: allows to customize general values such as the platform's title, favicon, default theme, default language and hidden entities (entity types you don't want to see in the platform)
- OpenCTI Platform: general information on the instance. Here you can notably see that OpenCTI can run clustered and whether it does so
- Platform announcement: allows you to set announcements on top of the GUI of the platform for authenticated users
- Third-party analytics: speaks for itself (at the moment of writing, only Google Analytics is supported)
- Dark theme and light theme: customize the built-in themes of the platform
- Tools: status of the various built-in tools and dependencies of OpenCTI
As you can see, this tab is mostly dedicated to general settings and platform state overview. This won't be the main module you will use in the settings but it is worth your time to check it from time to time.
Security
The security tab allows to manage access to the platform and its data.
Access to OpenCTI is granted using roles to define permissions, groups to gather users under roles, organizations to segment users and manage data sharing between organizations (enterprise version only) and use marking definitions to microsegment accesses.
First, roles allow to assign the various permissions to users. Most permissions speak for themselves. Let's review the ones that are a bit more complicated:
- The "Bypass all Capabilities" permission allows all the others, regardless of their status
- Connectors and Data Sharing management options are meant for power users as they allow to control automatic data ingestion and sharing
- The "Connectors API usage" permission is dedicated to service accounts used for the connectors.
Typically, I would segment roles between:
- Consumer users: they can access the platform in read-only mode, except for collaboration tools and enrichment
- Producer users: they can add and manage the data on the platform, run import and export tools, etc...
- Connector users: service accounts for connectors
- Administrator users: application administrators
For each role, I would create a group. I will have a one-to-one relationship between groups and roles but those are not limited to one.
We can then add users to groups and they will have the associated roles by transitivity. To assign groups to a new user, create the user and then look for it to modify it. Groups cannot be assigned at creation and groups assigned by default will first be applied (use appropriate roles for groups assigned by default).
The marking definitions tab allows to define the definitions that will be used in the platform. By default, only the TLP is defined. You can define other types such as the PAP or copyright strings.
Marking definitions can be used to limit user ability to access data based on the sensitivity. When modifying a group, you can set permitted marking definitions for users assigned to this group. Users will only be able to see objects with marking definitions that are in their allowed list.
The Policies subtab allows to set authentication policies and the Sessions subtab allows to monitor session tickets.
We won't go into the Organizations subtab. This is an enterprise version feature that allows to set up further data segregation between organizations that can access the platform.
Customization
The Customization tab allows to set defaults, setup inference rules, notifiers and retention policies. In short, this is the tab that allows you to simplify data input and processing platform-wide.
In the Entity Type subtab you can:
- Hide some types of objects
- Set defaults for entity attributes (for example set your organization as author automatically on new objects created by you)
- Set the mandatory status for entity attributes
- Set workflows for entity types (workflows allow to set a processing status on entities to follow the progress)
You can go in this subtab into great extends to tailor the platform to your needs.
The Rule Engine subtab allows to enable or disable inference rules. Inference rules are facilitators that infer relationships and entities for you.
For example, if a campaign targets an organization and if that campaign is attributed to an intrusion set, one of the rules will create a targets relationship between the intrusion set and the organization.
This allows a gain of time by some aspects but be aware of each rule you enable. Some could rather make you loose time by not corresponding to your needs. So pay attention to the details of the rule:

The notifiers subtab allows to create additional notification channels (by default, the user interface and the e-mail notifier are available). The notifiers subtab allows notably to configure a webhook notification (in cases such as notification using Microsoft Teams for example).
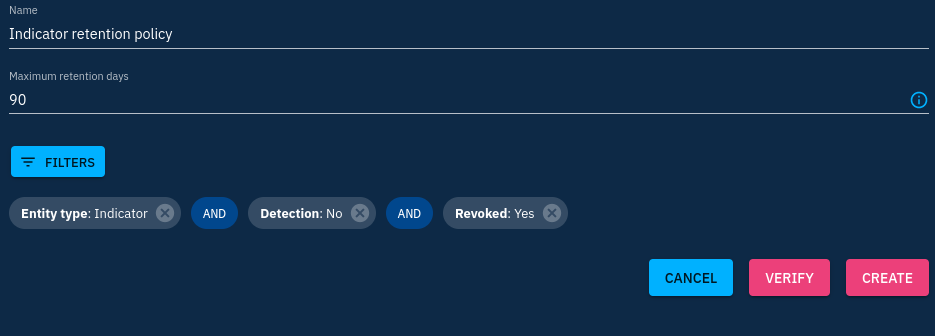
Lastly, the "Retention Policy" subtab allows to set rules for data deletion at its expiration. You can go deep in the filters allowing to select data to be processed for deletion. As an exercise, try to create a rule removing revoked indicators older than 3 months that were not detected.
Taxonomies
The Taxonomies tab allows you to define your own taxonomy throughout the platform.
First you can define labels. Labels can be assigned to nearly any object in the platform and allow to add context either to provide a first glance context on objects or to add context that couldn't be added otherwise (that is not specified in the model for example).
I'd recommend that you restrict user capability to create new labels and enforce the use of predetermined ones following your own classification. For each new label, you can define a color and tag of you choice.
For your inspiration, here are the pieces of information I like to add as contextual data through labels:
- Threat actor type: cybercriminal, state-sponsored, hacktivist
- Motivation: espionage, disruption, financial-gain
- Impact risk for my constituency: near (direct hit), mid (could hit), far (low risk)
- Malware types: ransomware, stealer
In the killchain subtab you can define your own kill chain phases but I'd recommend to stick to the ones defined by the MITRE Att&ck or the Lockheed Martin Cyber Kill Chain.
We'll see later that we can automatically define those.
The vocabulary subtab is already well-provided. It defines the enumerations that are valid for all kind of fields on the platform. Most of them are defined following the STIX standard.
You can only add elements to existing vocabulary. The only ones I would find useful to change here are the vocabularies associated with the following object types:
- Incident Response
- Malware analysis
- Request for information and Request for takedown
You can change any type you want but this may break compatibility with other STIX tools.
The Status templates subtab allows to define statuses that are used in the workflows all over the platform. Workflows can be enabled in the Customization tab for each object type. Here you can personalize every step of them.
The Case template allows you to define standard cases in the platform with predefined lists of tasks. OpenCTI doesn't aim to be a SOAR but you can somehow manage incident response cases with it. The case templates allow to accelerate things a bit in the platform in the early phases of the case.
Conclusion
We saw in this post that it is possible to go far in the customization of the OpenCTI platform. We'll see next how to automatically add, enrich and share data through connectors.